Last updated at Mon, 06 Nov 2017 19:03:16 GMT

Learn how to send IoT Data from the TI CC 2650 SensorTag to Logentries (using Node-Red).
This is the first of a series of IoT blogs that show you how easy it can be to integrate a range of real sensor devices with Logentries and how to use the data from those devices once it is in Logentries. This follows the earlier blog showing why a centralised logging service would be useful for IoT developers and users. This series of blogs will show just how true the points made in that blog are:
- The suitability of a logging service for searching and analysing IoT sensor data as it is generally timestamped and in a range of structured and unstructured formats, like log data.
- The need for a variety of ways to ingest data, usually via an agent or gateway are shared characteristics of IoT and logging services.
- The value of storing data from all sensors (and application logs) in a shared store for aggregation, search and analysis.
- The volume, variety and velocity of sensor data makes a cloud based solution suitable, as it is for log data.
- Developers can accept the diversity of IoT device data by using a service like Logentries that can handle such diversity and still search and analyse that data, rather than relying on one of the emerging standards and normalising diverse IoT data inputs into one or more common formats for storage and analysis.
NOTE: The approach shown here using Node-Red will allow any IoT device supported by Node-Red (including MQTT devices) to send their data easily to Logentries.
The first Sensor we will show using Logentries is the Texas Instruments TI CC2650 SensorTag. While it is not trivial to develop applications for the Internet of Things (IoT) using Bluetooth Low Energy (BLE), this blog will show it can be made easier using nodeJS and high-level JavaScript libraries.
For this blog you will need:
- A CC2650 SensorTag (available fromTexas Instruments website)
- A Bluetooth Low Energy enabled laptop (later blogs will show you how to do it using a Raspberry Pi)
- The SensorTag NodeJS plugin
- IBM’s NodeRed application (later blogs will show you how to do it directly)
- The Logentries NodeJS plugin
- A free Logentries Account (this blog will show you how to do that)
Texas Instruments CC2650 SensorTag
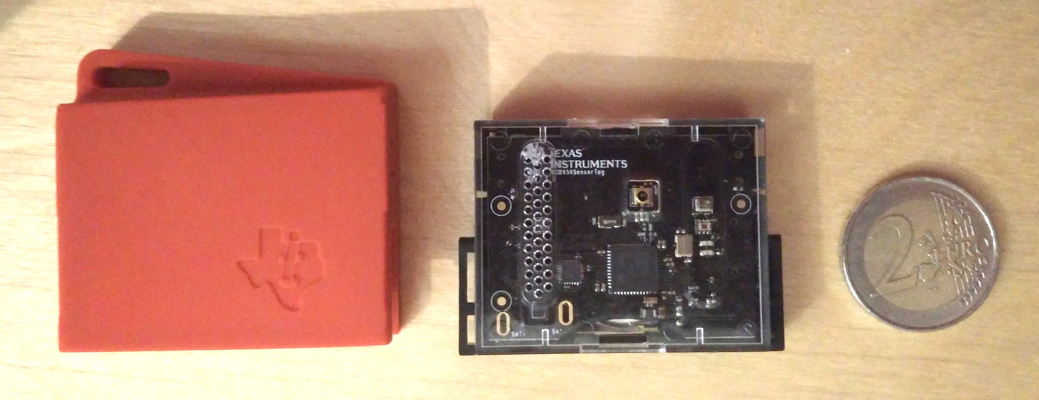
This is a battery powered device using the ultra-low power CC2650 wireless MCU and it supports development for Bluetooth Smart (includes Bluetooth Low Energy), 6LoWPAN and ZigBee. It can be used to develop a range of applications as it includes sensors for Temperature (IR sensor), Temperature (ambient), Air pressure, Hygrometer, Accelerometer (tri-axis), Gyroscope (tri-axis), Magnetometer (tri-axis). The SensorTag comes with a demo app that runs on an Android or iOS device (with the required BTLE hardware and software) and it displays the readings of the sensors on the SensorTag. The photograph below shows it outside its case and how small it is relative to a 2 Euro coin.
Setting up Bluetooth Low Energy (BTLE) on your laptop
A number of blog posts show how to use a Wireless Dongle and a Raspberry PI to interface with the Bluetooth Low Energy (BTLE) interface of the C2650 on your laptop, and we will show this in a later blog, but perhaps the easiest way to access these devices is to use your laptop itself if it has support for BTLE, e.g it is supported on Windows 8, IOS 5 and later and Linux 3.4 using bluez. On my Lenovo laptop running Ubuntu 14.04 LTS, I installed bluez using
> sudo apt-get install bluez > sudo apt-get install bluez-utils > /etc/init.d/bluez-utils restart
Then I used hcitool (a tool to configure Bluetooth connections) to verify it was working by finding the address of my bluetooth device:
> sudo hcitool dev Devices: hci0 AA:BB:CC:ZZ:YY:ZZ
Next, I switched on my SensorTag and used hcitool to scan and see if the SensorTag was seen:
> sudo hcitool lescan LE Scan ... B0:BB:ZZ:ZZ:ZZ:01 CC2650 SensorTag
Now we can connect to the SensorTag, so let’s try to get some data off it using Node-Red.
Setting up Node-Red
Node-Red is an application which runs on top of NodeJS. It allows flows of data between devices and applications (“nodes”) to be constructed using a simple drag-and-drop visual tool that runs in a browser, although code can be written to extend modules as it runs on normal NodeJS. A range of nodes exist, such as inputs and outputs for tcp/udp/http/mqtt/websocket, functions such as switch/change/range, social media such as twitter/email and storage nodes such as file and Logentries. An earlier blog shows how to install and set up Node-Red with Logentries. The instructions in that blog can be summarised as:
- Install nodejs
- Install Node-Red
> sudo npm install -g node-red
- In your node-red node_modules directory, e.g. /usr/local/lib/node_modules/node-red
> node red.js --userDir /home/myname/node-red-data/
- Connect to Node Red using the URL
http://127.0.0.1:1880and you will see a screen appear that allows you to create a flow - The Screenshot below shows a flow created simply by moving the “inject” and “debug” (appears a msg.payload) node icons from the left panel’s input and output sections to the main panel and connecting them. Clicking on the node allows you to update its configuration, e.g. renamed input to Test Generator and set the message it sends.
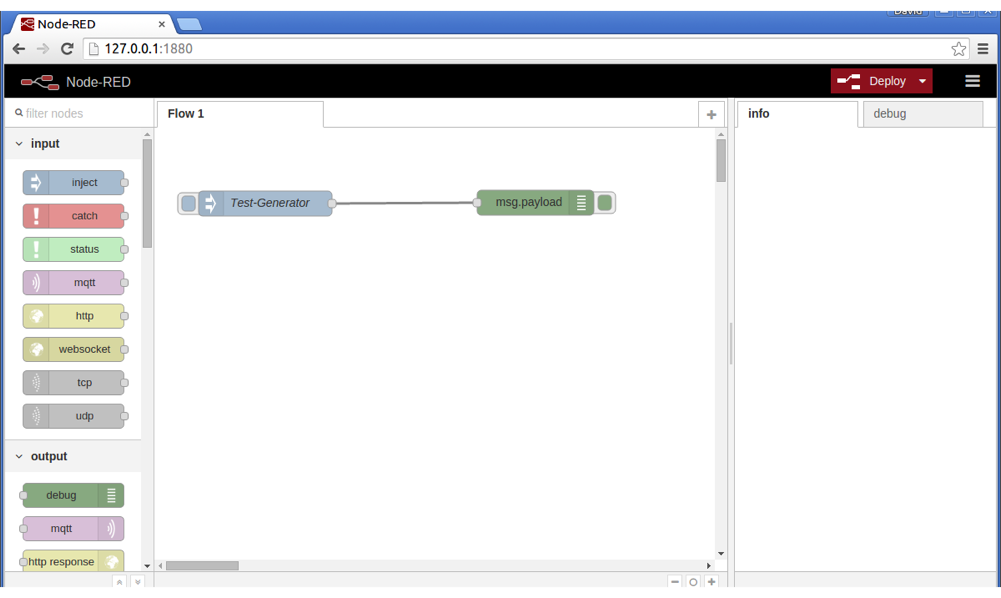
- Click “Deploy” in the upper right of the screen and the flow is deployed. Then each time the “button” on the left of the “Test Generator” is pressed a message appears in the Debug panel on the right.
Sending Data to Logentries from Node-Red
- Install Logentries Node-Red node (this includes Logentries node module which can also be downloaded separately from here and this includes examples for its use outside Node-Red) > sudo npm node-red-contrib-logentries
Note this node module consists of two files for Node-Red (a .html file to show the icon for the Logentries node and a .js file to interface between Node-Red and the Logentries NodeJS library)
2. Get a Logentries Account (you can set up a free trial account!)
3. Login to your Logentries account and create a log in Logentries using the Token TCP type, where a token is generated which uniquely identifies the destination log – “How to Set up / Create A Token-based Log”.
4. Go to that log in Logentries.com and and grab its “token”. That token is what goes into the configuration of the Node-Red node.
5. Drag the Logentries node icon from the storage section of the left panel into the main Node-Red panel of the flow created earlier. The icon will have a red triangle on top indicating it needs to be configured.
6. Click on the Logentries node icon and enter the token for that node in the configuration window
(the red triangle goes away if this is correct)
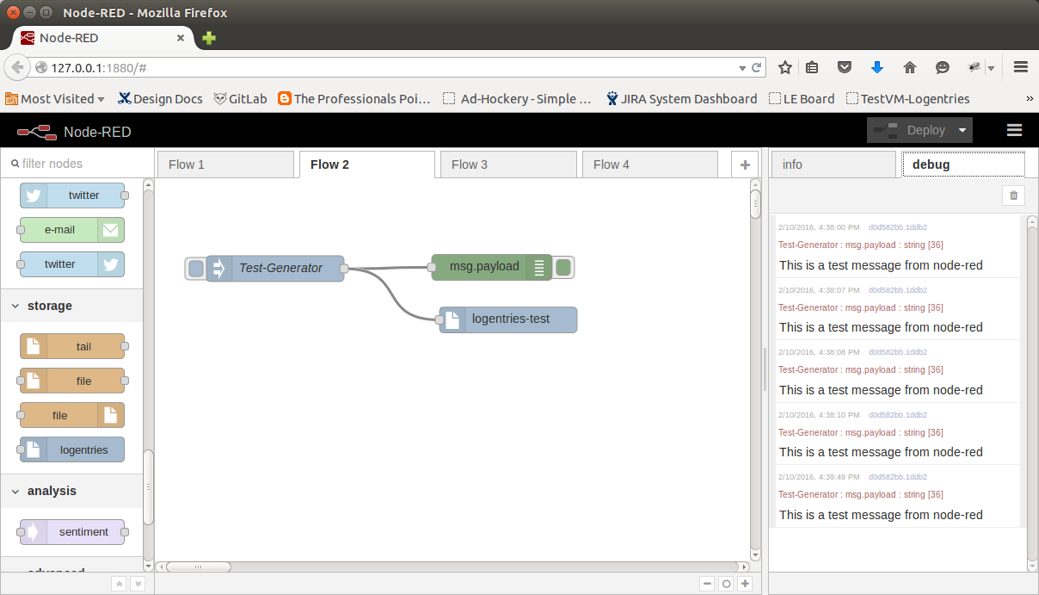
- The Screenshot shows a flow created simply by adding a link between the Logentries node and the “Test Generator”. Now deploy this flow and each time the “button” on the left of the “Test Generator” is pressed a message is sent to your Logentries account and appears in the debug panel on the right.
Add SensorTag to Node-Red
- Go to https://github.com/node-red/node-red-nodes to see the range of nodes available for Node-Red. The SensorTag repository is under https://github.com/node-red/node-red-nodes/tree/master/hardware/sensorTag
- https://github.com/node-red/node-red-nodes/tree/master/hardware> sudo npm install node-red-node-sensortag
Note: This node module uses a separate library to access the SensorTag over BTLE that currently only supports using 1 SensorTag at a time.
3. Install the SensorTag library – see separate note below for steps that may be required before installing this module > sudo npm install sensortag
Note: See https://www.npmjs.com/package/sensortag and https://github.com/sandeepmistry/node-sensortag
4. Start the Node-Red server again (Note: needs to run as root to access the Linux Bluetooth 4.0 system calls) > sudo node red.js --userDir /home/myname/node-red-data/
5. Drag the TagSensor node icon from the advanced section of the left panel into the main Node-Red panel of a flow with Logentries node (or just add it to the earlier flow and you see the output in the debug panel and can mix in messages from the test generator).
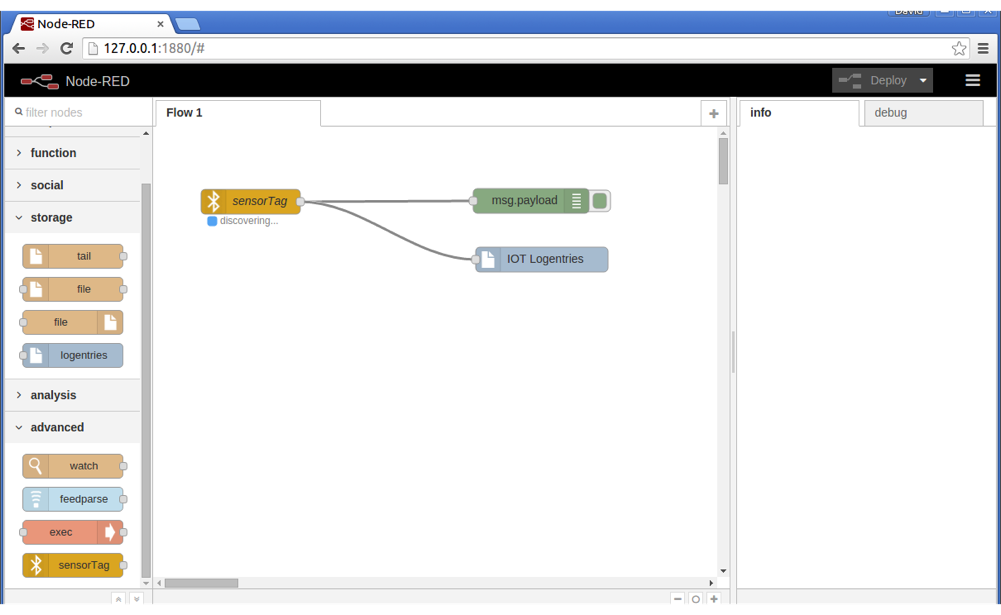
6. The Screenshot shows the resulting flow above – you see “discovering” under the SensorTag icon, which changes to “connected” when you switch on your SensorTag device and it connects successfully over Bluetooth. You will also see the messages from the SensorTag appear in the debug panel in the right and these messages are also sent to your Logentries account.
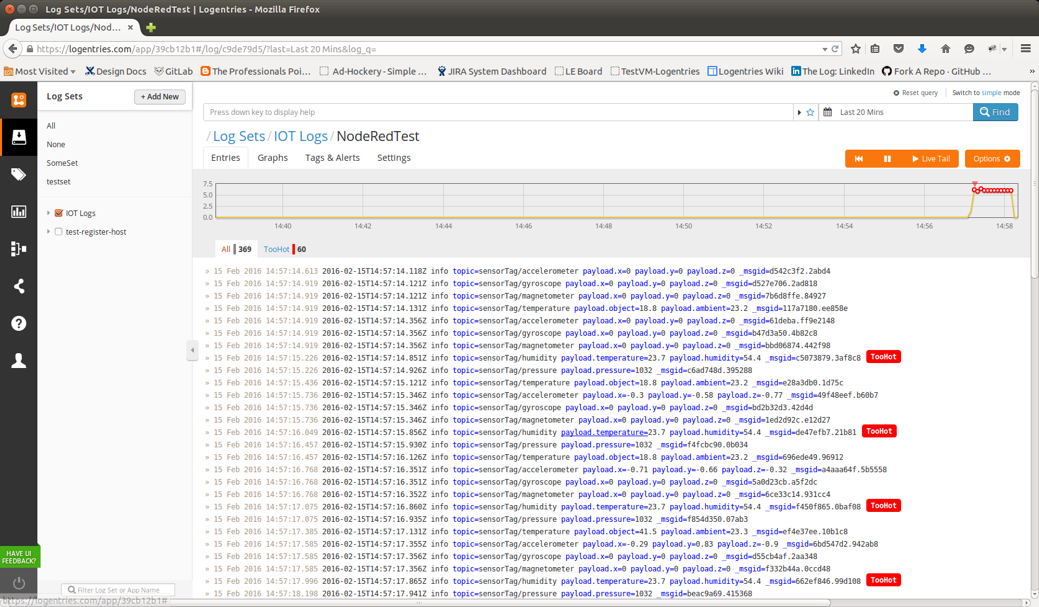
7. Go to Logentries.com and log into your account and select the log whos token you configured in Node-Red. Your can use LiveTail to see the messages as they arrive or can you do a search and you will see a screenshot like below where the data sent by SensorTag can be seen, with one example of a label “Too Hot” set when the temperature was above 23. The next blog will show how easily this data can be searched and analysed using LEQL once it is in Logentries.
Future Blogs…
The next blog will be “The Power of IOT and LEQL – Using Logentries Query Language (LEQL) for Analysing Sensor Data”. The blogs to follow afterwards include:
- Sending Sensor Data directly from the TI CC 2650 SensorTag data to Logentries – this will show how to do it without Node-Red
- Using Raspberry PI to act as a gateway for IoT devices such as the TI CC2650 to Logentries
- Using MQTT enabled devices with Logentries
- IoT Security Considerations and how a Logging Service can help, e.g audit trails are likely to play a major role in enhancing IoT device security or using a log analysis tool to notify the device owner of unauthorized access or an unusual reconfiguration.
And more to come after those…..such as combining generated or application log data with IoT data.
Note on Installing SensorTag module
To run the SensorTag module, you may have to update the node version. I used the Node binary manager module ‘n’:
sudo npm cache clean -f (be aware that this clears your npm cache) > sudo npm install -g n (this installs ‘n’) > sudo n 0.8.11 (this upgrades to a particular version)
Or you can just tell the manager to install the latest stable version as below:
> sudo n stable
To avoid errors installing the Sensortag module you may need to do this:
> npm install -g node-gyp (see https://github.com/nodejs/node-gyp#installation) > sudo npm install noble
Ready to get started sending IoT data to Logentries? Create a free Logentries account in less than a minute at logentries.com.