Last updated at Tue, 12 Dec 2023 21:21:26 GMT
Amazon Web Services Lambda functions are very cool. A Lambda function is a feature in Amazon Web Services that allows you to put a discrete piece of computing logic up in The Cloud and then access that logic to meet a particular need. For example, you can create a Lambda function that takes a list of stock symbols and does some analysis on the list using other cloud based services in order to suggest the best stock to buy.
Logentries has put the power of Lambda functions to good use. The company has created code that forwards messages sent to a topic in Amazon’s Simple Notification Service (SNS) onto a log set in Logentries. This code is executed from within a Lambda function. The details about how this code works in conjunction with Amazon Web Services is shown below in Figure 1:
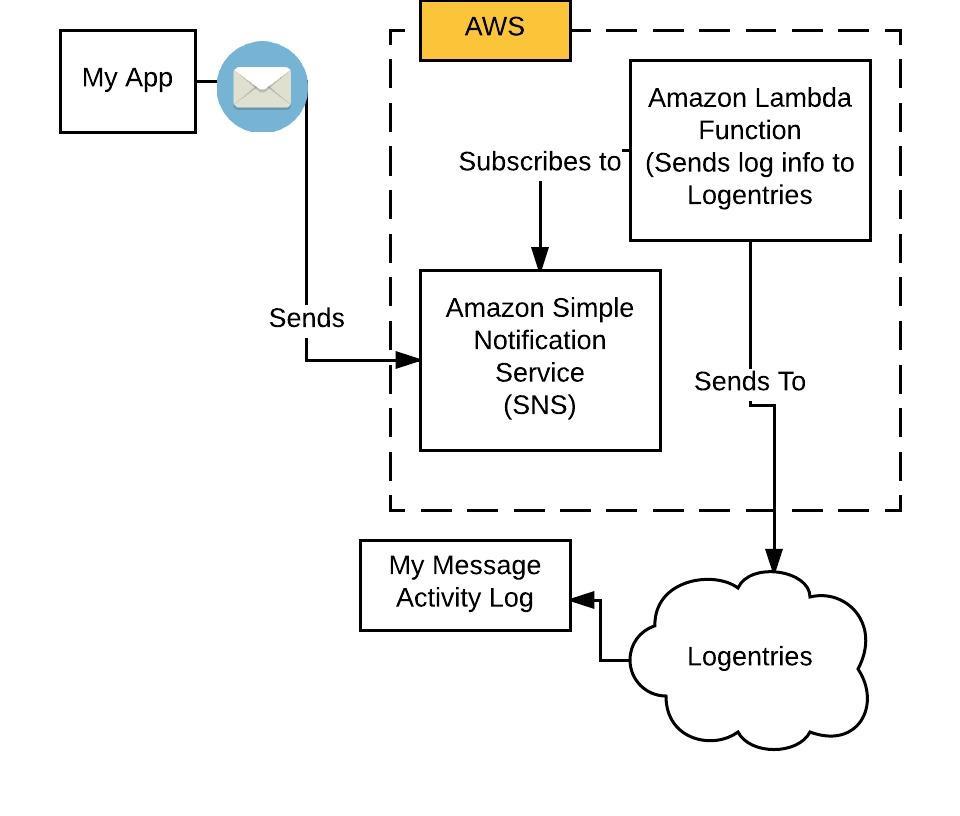 Figure 1: The Lambda function will Logentries code will subscribe to an SNS Topic
You can download this code from GitHub (https://github.com/LogentriesCommunity/le-aws-sns). It’s available to all.
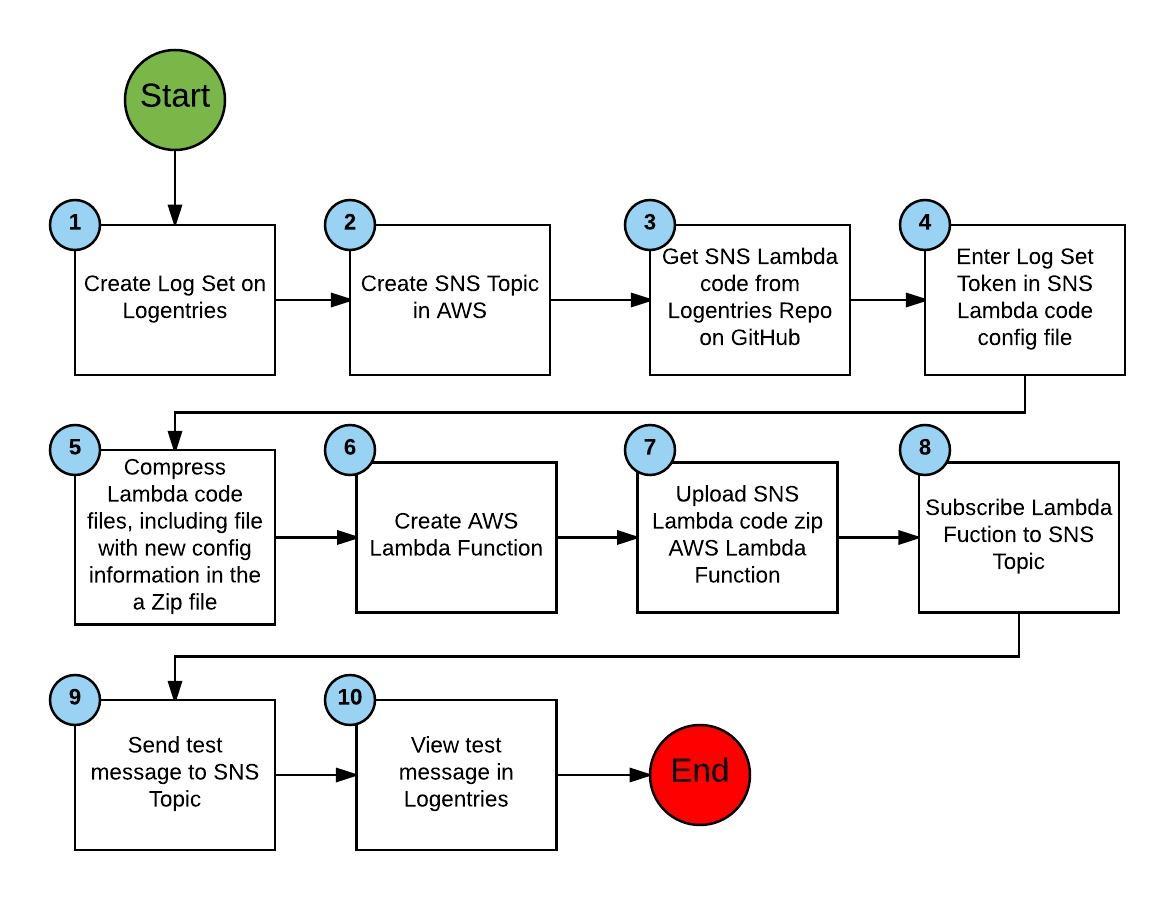
In this article, I am going to show you how to install the Logentries SNS Lambda code in your own Lambda function and then create a SNS Topic to which the Lambda function will subscribe. The result will be that any message to the SNS Topic you created will be forwarded onto the Logentries log set associated with the token that you set in configuration file. Figure 2 below shows the steps in the process.
Why SNS?
The reason that I chose SNS technology to demonstrate the power of Lambda functions is one of simplicity. Lambda functions are very powerful and you can do a lot with them well outside the scope of forwarding messages to a cloud based site such as Logentries. However, demonstrating a more complex use of Lambda functions would require time and space well outside the scope of a blog entry.
Still, demonstrating now to get a Lambda function to interact with SNS explains the concepts you need to know well. Using the Logentries code kills two birds with one stone. First, should you so desire, you can explore the code provided by Logentries to learn the details of programming Lambda functions in Python. Second, using the Logentries’s code allows you to gain experience using Lambda functions in a very clever manner.
Getting and Configuring the SNS Code from GitHub
The code you will be installing in a Lambda function is available here. Once you have the code in hand, you need to add settings to the configuration file, le_config.py. le_config.py is part of the code you’ll find on GitHub. You set the token of the log set to which you want SNS messages to be logged. Also, you will provide your username. Listing 1 below shows an example of the configuration file, le_config.py.
# Logentries tokens

# This token is used to associate AWS CloudWatch logs to a log in your Logentries account.

log_token = "YOUR_LOGENTRIES_TOKEN_HERE"


# You can supply an optional token to log activity to a log on Logentries and any errors from this script.

# This is optional, it is recommended you use one log file/token for all your Lambda scripts. If you do not

# wish to use this, just leave the value blank.

debug_token = "YOUR_LOGENTRIES_TOKEN_HERE"


# Log to generic activity from this script to our support logging system for Lambda scripts

# this is optional, but helps us improve our service nad can be hand for us helping you debug any issues

# just remove this token if you wish (leave variable in place)

lambda_token = "0ae0162e-855a-4b54-9ae3-bd103006bfc0"


username = "myusername""
Listing 1: You’ll set log_token and debug_token to use the token associated your Logentries log set
Creating the Logset on Logentries
You’ll need to create a TCP log and log set into which the SNS messages will be logged. When you create the log, a token is created too. You’ll use this token in the Lambda function configuration file, le_config.py, to bind the Lambda function output to the log in Logentries.
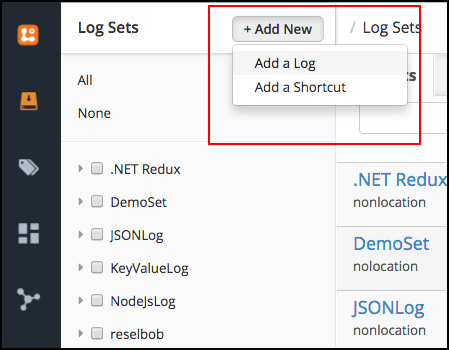
In order to create the log set and token in Logentries, login to the Logentries site, click the button labeled, Add New and select, Add a Log, as shown in Figure 3, below.
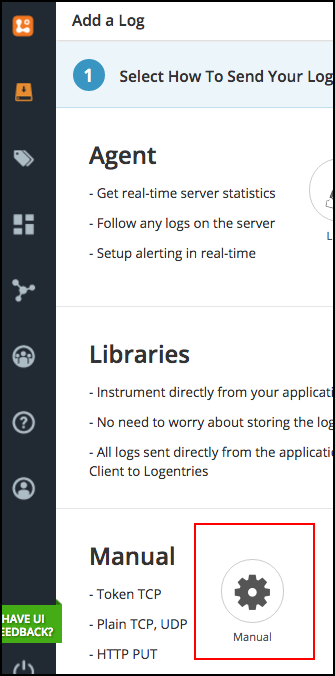
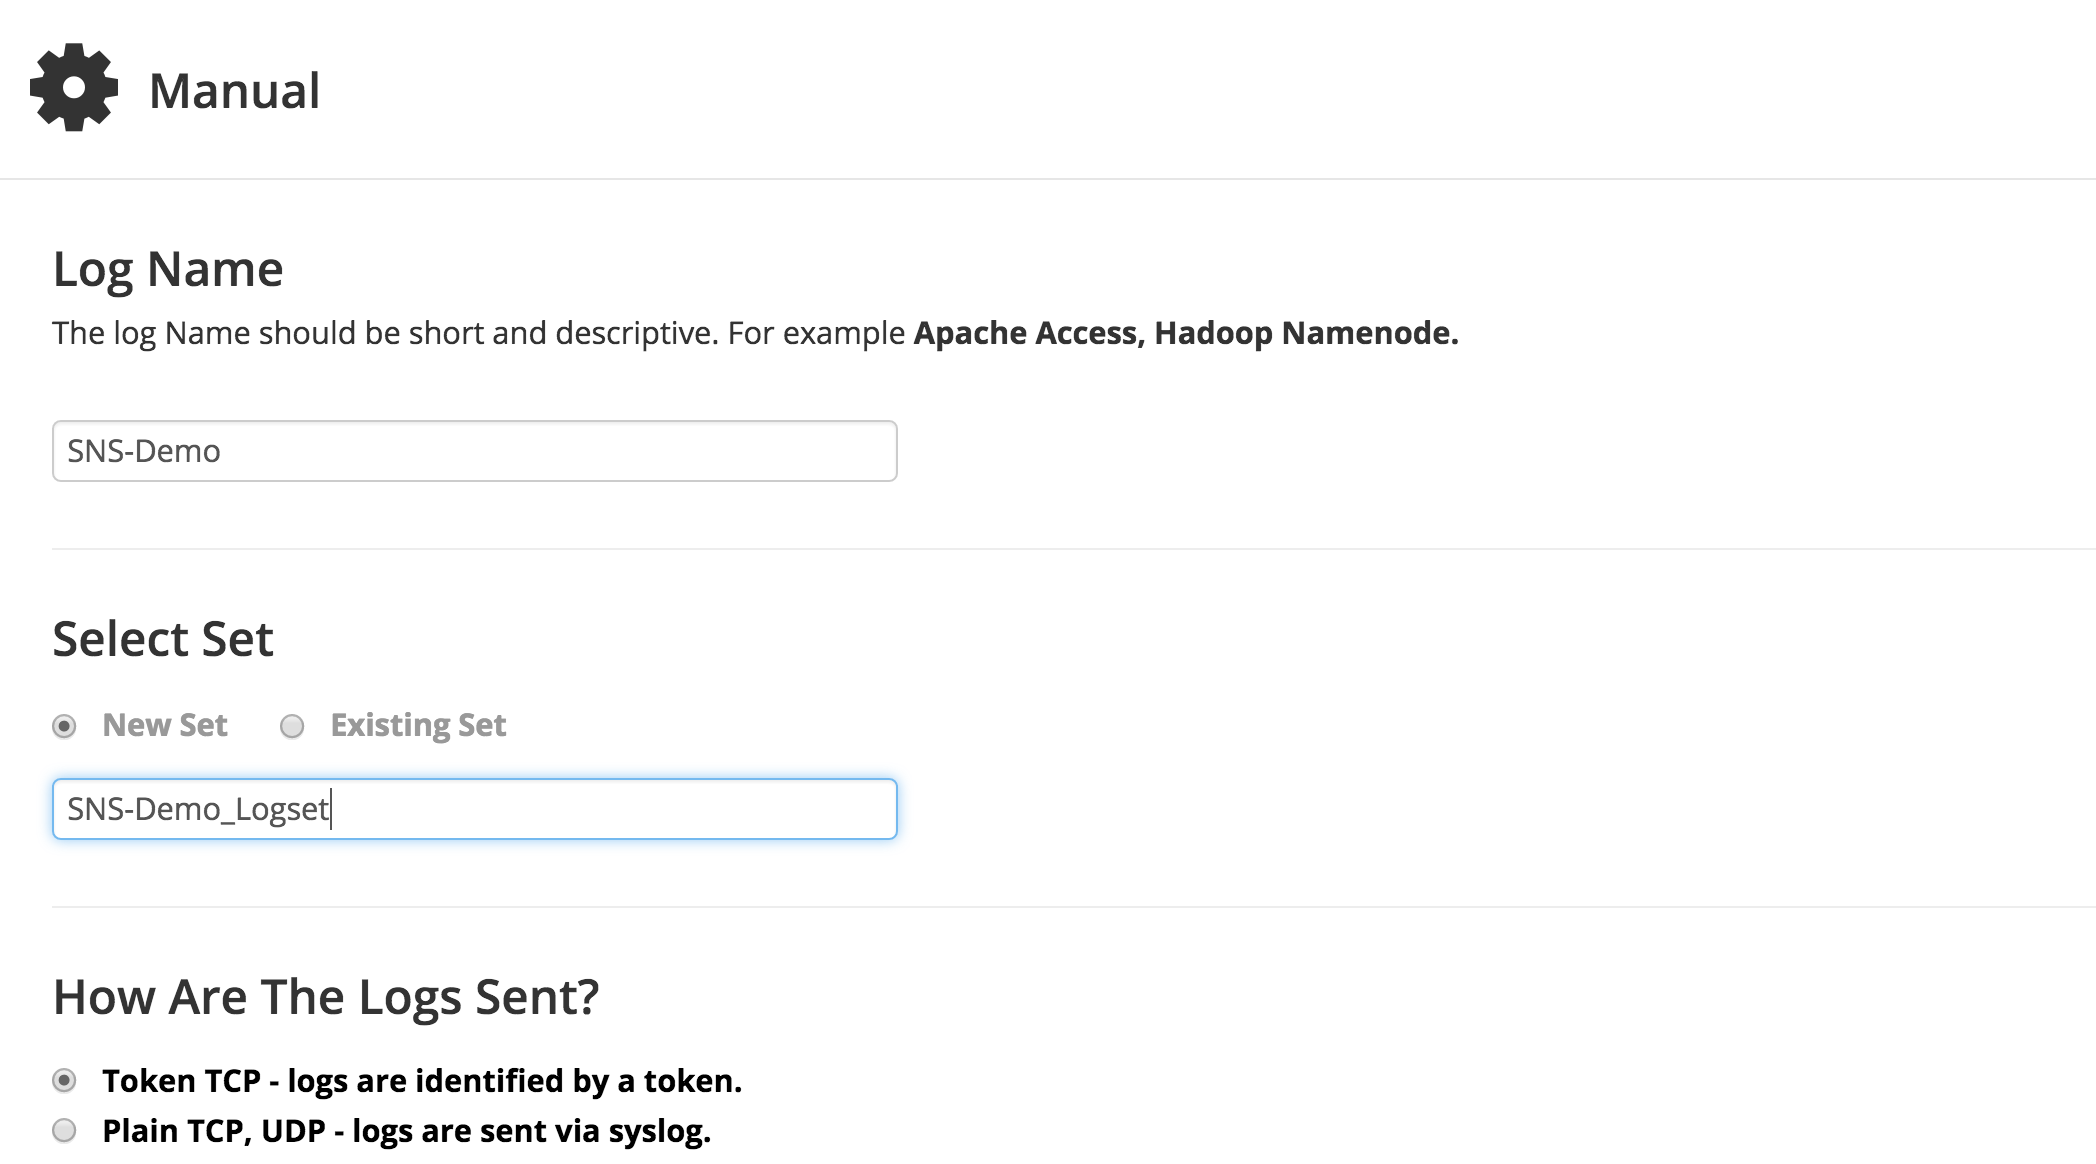
When you Add a Log, you will be provided with a page that offers choices as to the type of Log you want to create. We’re going to create a log manually, so select Manual as highlighted in a red border below in Figure 4.
Clicking the button labeled Manual displays the Manual dialog. Enter a value for the Log Name and a value for a New Set in the Select Set text box, as shown below in Figure 5.
Upon creating the Log, the token that corresponds to the log will be displayed, as shown in Figure 6, below.

Enter the token you generated in the config file, le_config.py, as shown above in Listing 1.
Ready to try out Lambda and Logentries for yourself? Check out Rapid7's InsightIDR Product here
Having entered your token information into the file, config.py, you’ll compress the three files from GitHub, config.py, le_sns.py and l e_certs.pem into a single zip file which you will upload to AWS when making your Lambda function.
Now that you’ve taken care of adding configuration information to the Logentries code for the Lambda function, you need to create the topic on AWS to which the Lambda function will subscribe.
Creating the SNS Topic in Amazon Web Services
You create an SNS topic by first accessing the SNS service as shown in Figure 7 below. Click the SNS icon on the lower right to be taken to the SNS home page.
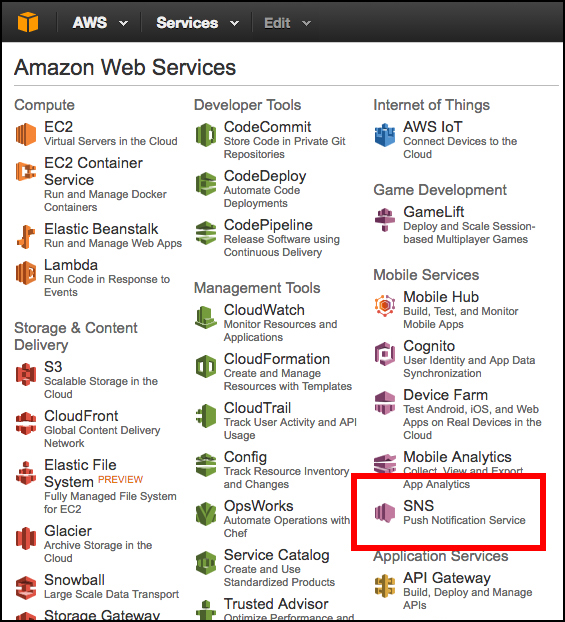
Figure 7: SNS is a service that is found on the Amazon Web Services home page.
Upon arriving at the SNS Home Page, click the Create Topic link to get the page where you will create your SNS topic. See Figure 8 below.
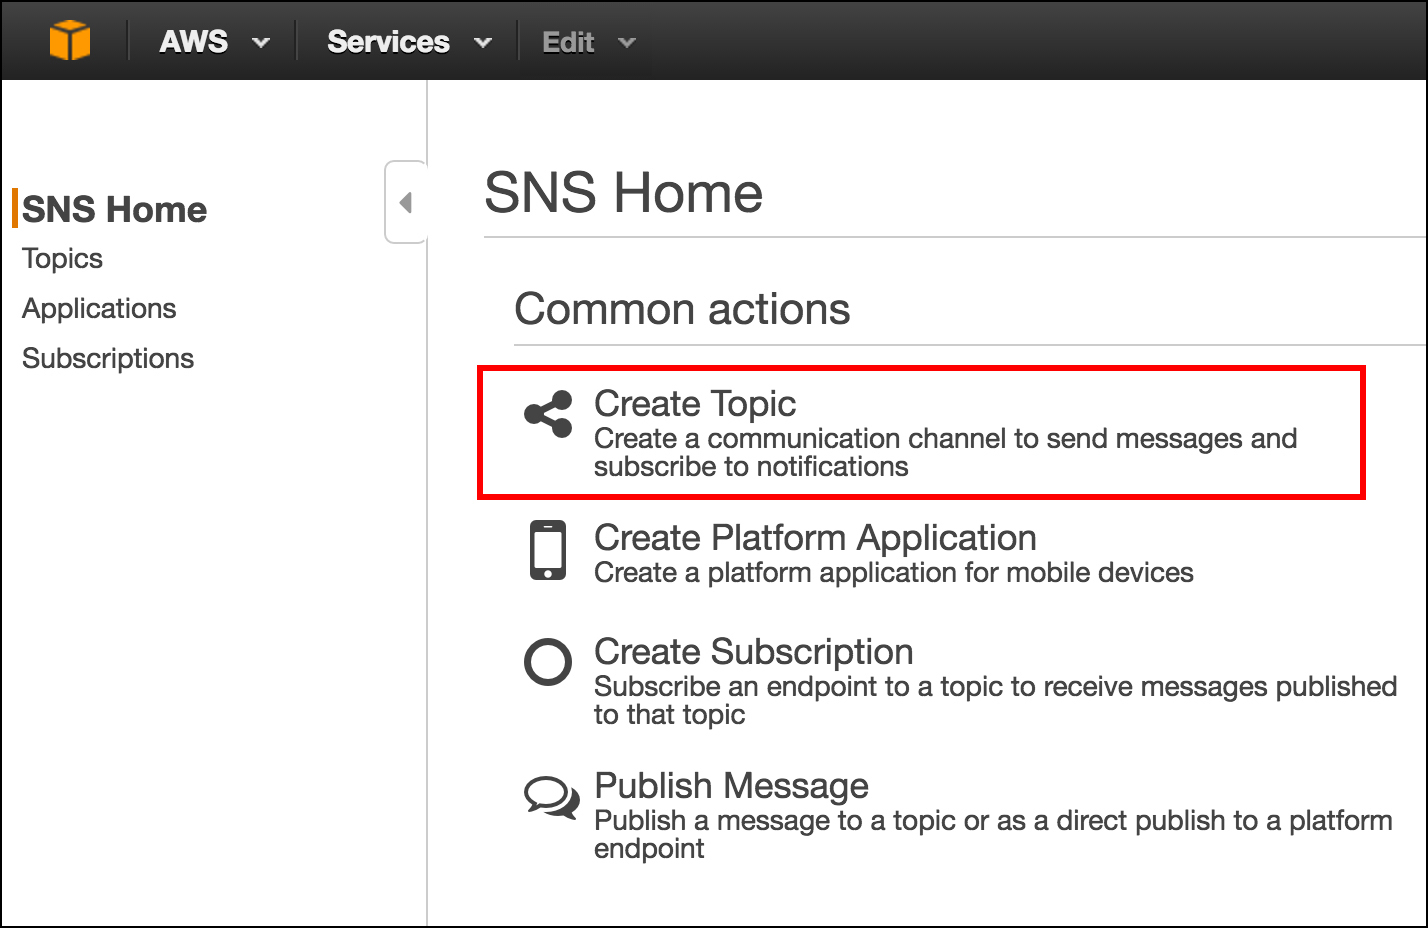
Figure 8: Your Lambda function will subscribe to a SNS Topic you create
Upon arriving at the Create new topic page, add a Topic name and Display name in the respective text boxes. In this case, I’ve used the term, snstopic for both Topic and Display Name. (See Figure 9, below.) Then, click the button, Create topic on the lower right of the dialog.
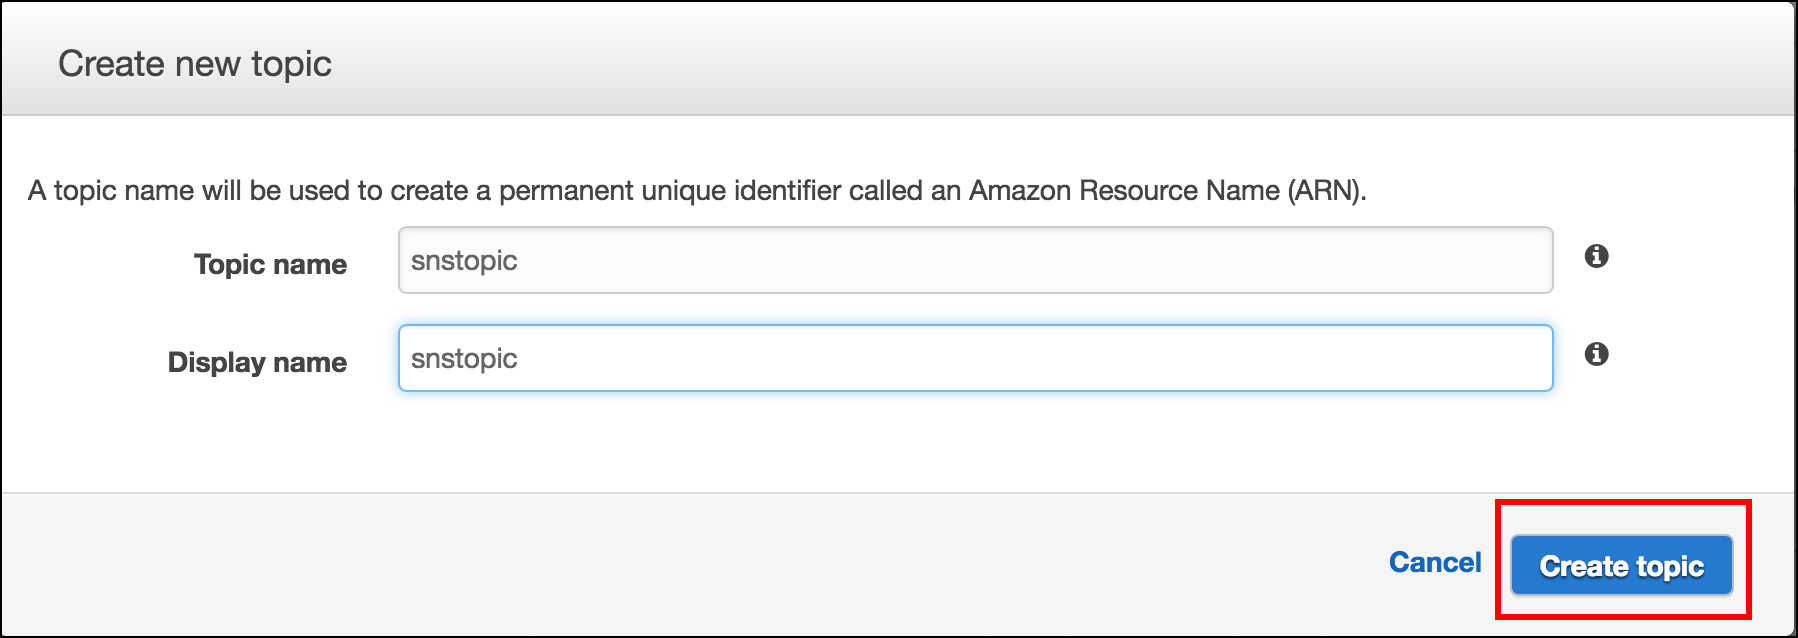 Figure 9: When creating a topic, you will provide a string for the Topic name and one for the Display name
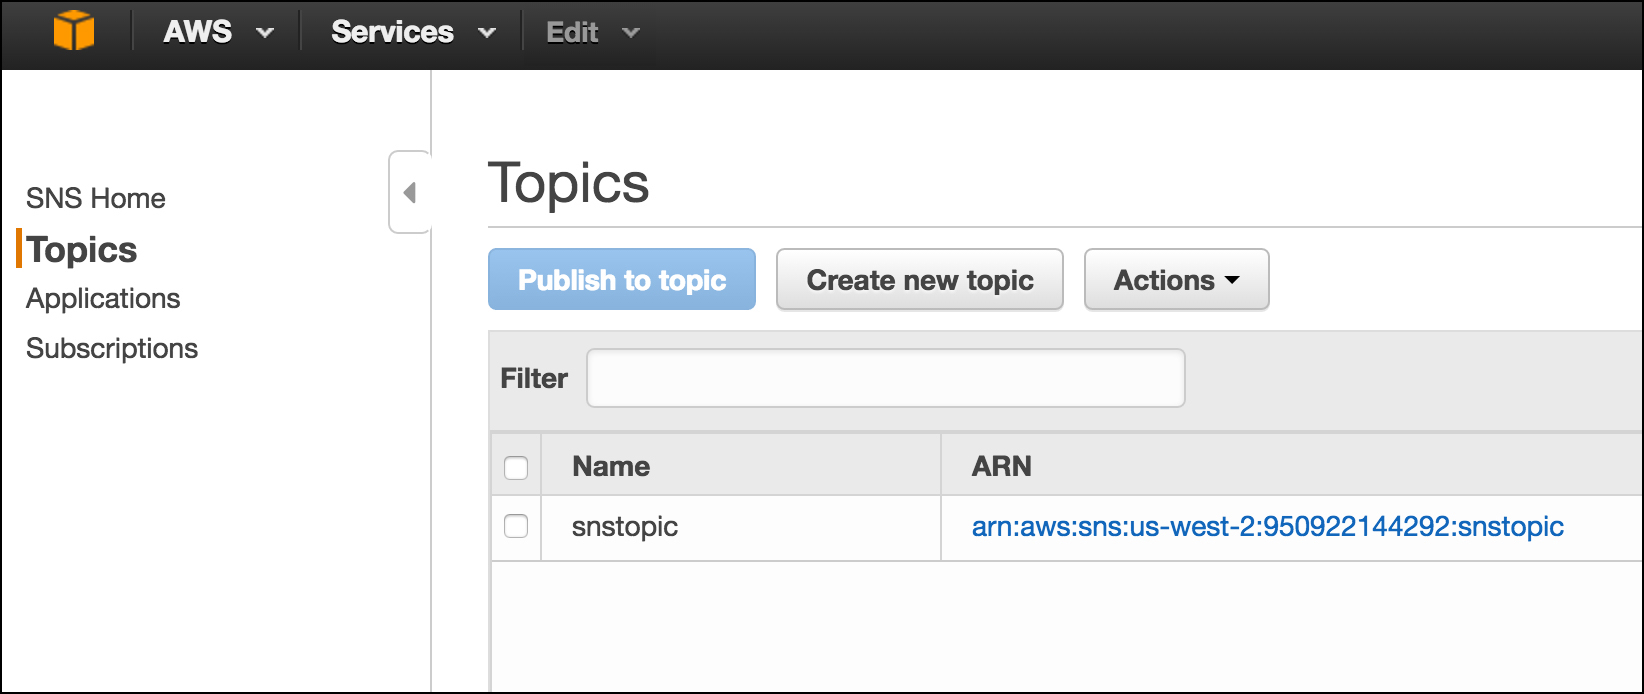
Upon success, you will be taken back to the Topics home page and your newly created topic will appear in the list of Topics, as shown below in Figure 10.
Now you have a topic to which a Lambda function can subscribe. In this case, we are going to create a Lambda function that will forward any message sent to the topic onto Logentries. We create the Lambda function and then upload the Logentries code we configured and compressed into a zip file earlier.
Creating the Lambda function in Amazon Web Services
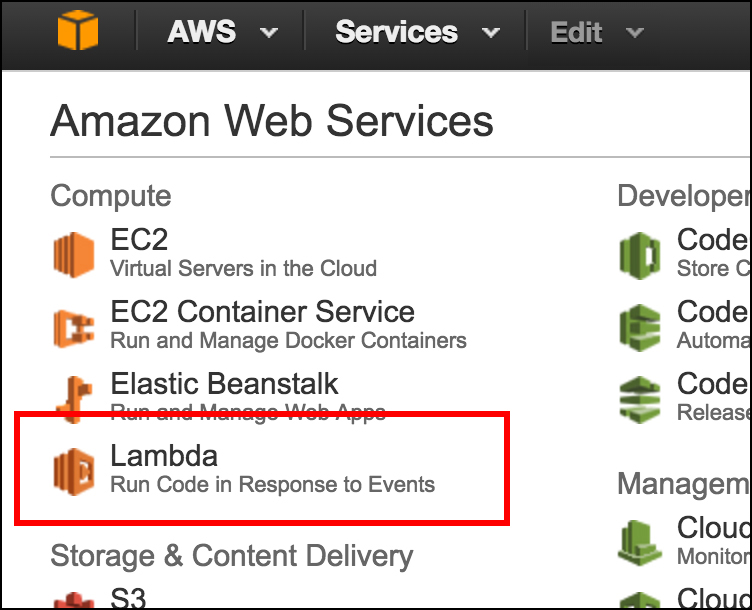
To create the Lambda function we’ll go to the Lambda service in AWS. To get to the Lambda services home page, click the Lambda services image on the Amazon Web Services home page as shown below in Figure 11.
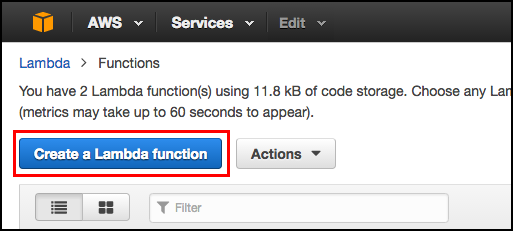
You’ll be taken to the Lambda Services page. Click the button titled, Create a Lambda function, as shown below in Figure 12.
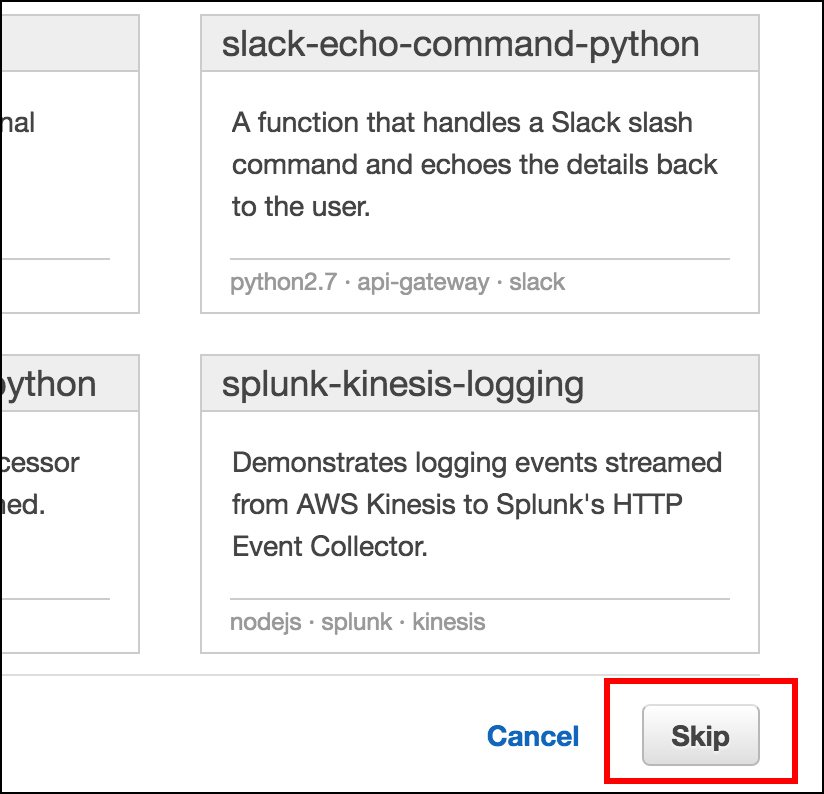
When you click the button labeled, Create a Lambda function, you will be taken to a page that displays a number of predefined Lambda functions. We’re not interested in any of these. So, click the button labeled, Skip on the lower right of the page, as shown below in Figure 13.
Clicking the button labeled, Skip will take you to the page in which you’ll configure a custom Lambda function that will forward messages onto Logentries. The Configure function page is shown below in Figure 14.
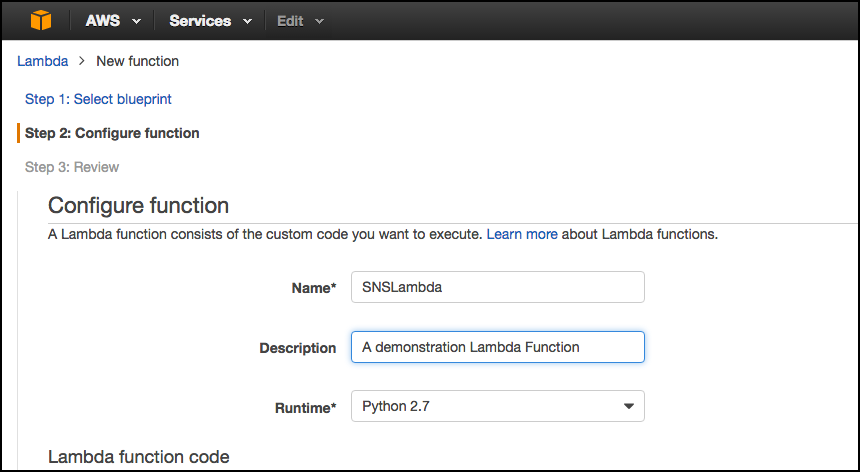
In the Configure function page, enter a Name for your Lambda function and a Description in the text boxes as shown above in Figure 14. Also, for Runtime, select Python 2.7 from the drop down list. Then scroll down a bit to the section,* Lambda function code* as shown below in Figure 15.
Select the option button labeled, Upload a .ZIP file. The click the button labeled, Upload, which will show the file upload dialog. Select the .ZIP with the Python code you compressed earlier. In this case I named the .ZIP file, le_sns.zip, which is the one I uploaded.

After you upload the file, as shown above in Figure 15, in the text box labeled, Handler*, enter the term, ls_sns.lambda_hander. This is really important, so I will say it again. In the text box labeled, Handler*, enter the term, ls_sns.lambda_hander. If you do not enter this term, ls_sns.lambda_hander, for the Handler, the Lambda function will not work!
In the drop down labeled, Role*, select lambda_basic_execution, as shown below in Figure 16.

Leave the text boxes and dropdowns that follow as is. Then click the button labeled, Next in the lower right of the page. (See Figure 16 above.)
You will be taken to the review page, as shown below in Figure 17.
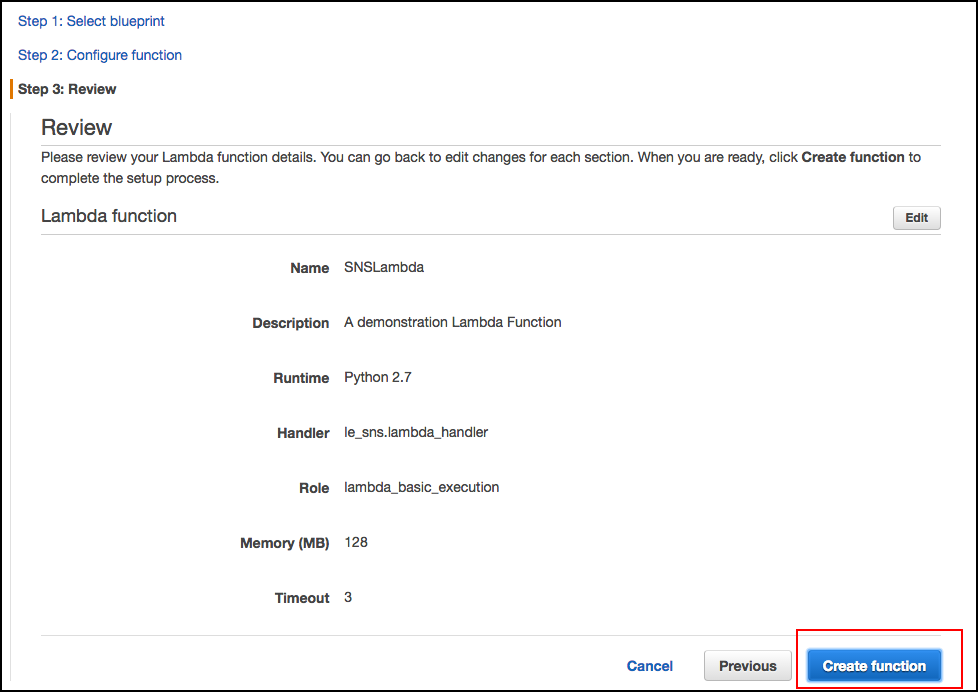
If all looks good, click the button labeled,* Create function* as shown above in Figure 17. Otherwise, click the button labeled, Previous to go back and make corrections.
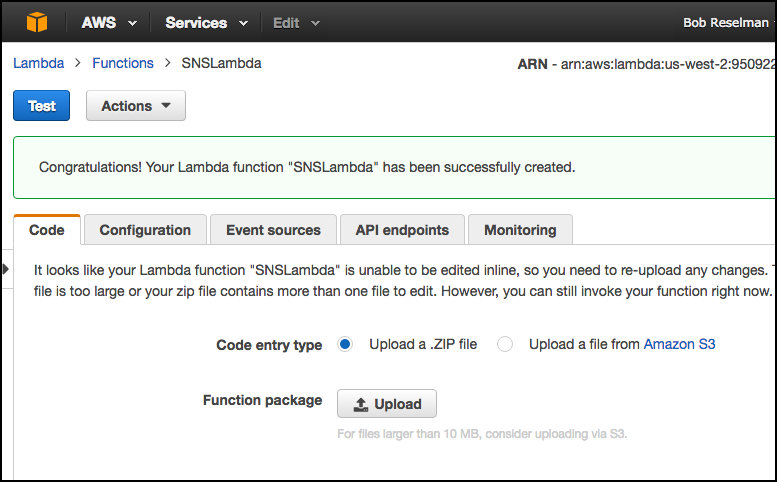
If all is well, you will see a Congratulations message in green as shown below in Figure 18.
Now you are ready to subscribe the Lambda function to the SNS topic you create earlier.
Subscribing the Lambda function to the SNS Topic
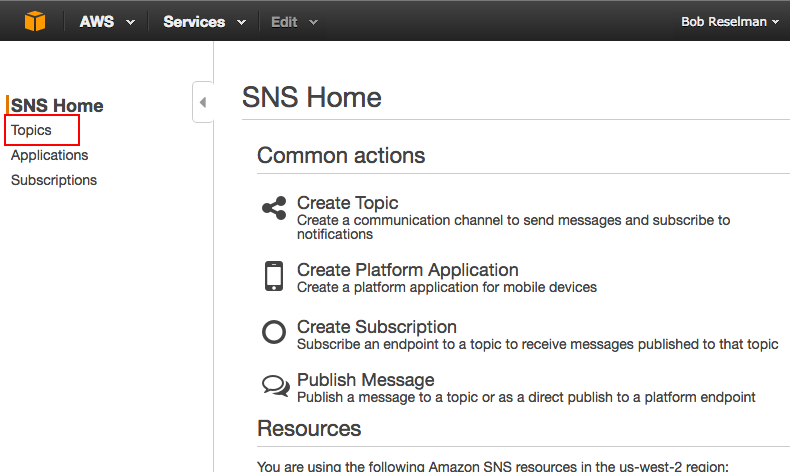
To subscribe your Lambda function to the SNS topic you created, go back to the main Amazon Web Services page, and click the SNS button, as shown below in Figure 19.

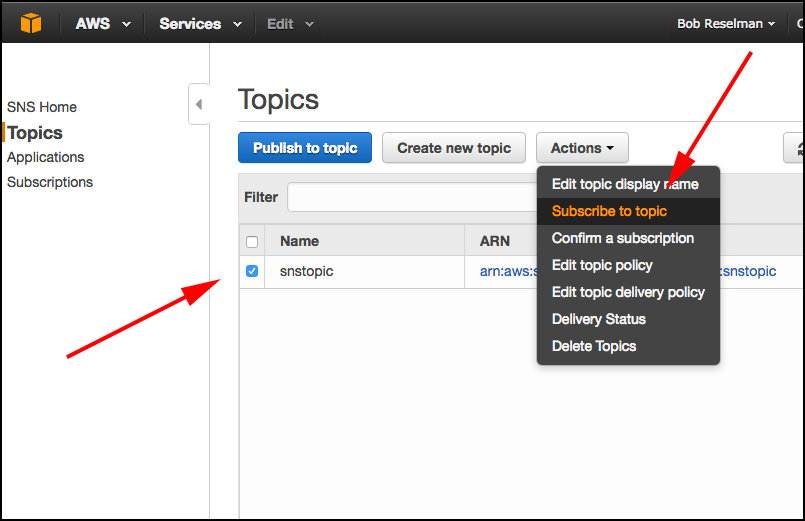
Click the Topics link on the left of the SNS Home page, as shown below in Figure 20.
Clicking the Topics link on the SNS Home page displays the Topics page, as shown below in Figure 21. You will see the SNS topic we created earlier. Select the topic by checking the checkbox to the left of the topic in the list. Then, once the topic checkbox is checked, select the item, Subscribe to topic, from the Actions drop down. You display the Actions drop down by clicking the button labeled, Actions, which is directly above the list, to the right. (Again, please see Figure 21, below.)
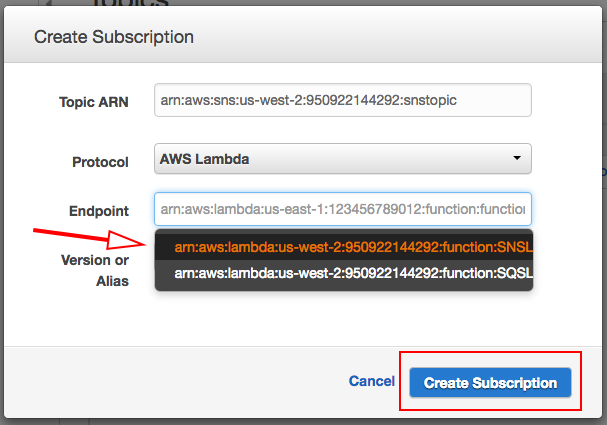
Selecting the item, Subscribe to topic displays the Create Subscription dialog. In the Protocol drop down of the dialog, select the item, AWS Lambda. In the Endpoint drop down, select the Amazon Resource Name (ARN) that corresponds to the Lambda function we created. In this case, the Lambda function is named SNSLambda, so I selected accordingly. (Please see Figure 22, below.)
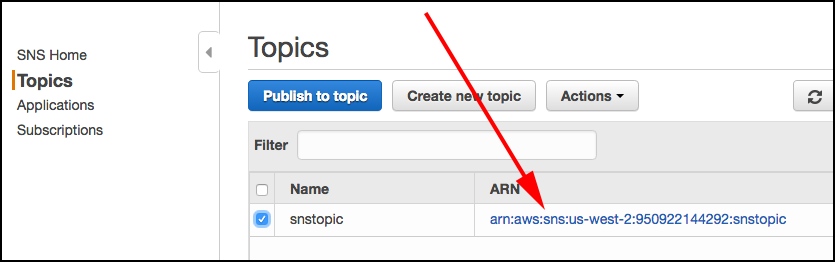
After clicking the button labeled, Create Subscription, as shown above in Figure 22, you will be taken back to the Topics page. We want to send a test message. So check the topic in the Topics list and then click the link in the ARN column, as show below in Figure 23. Clicking the link will take you to the detail page for the topic.
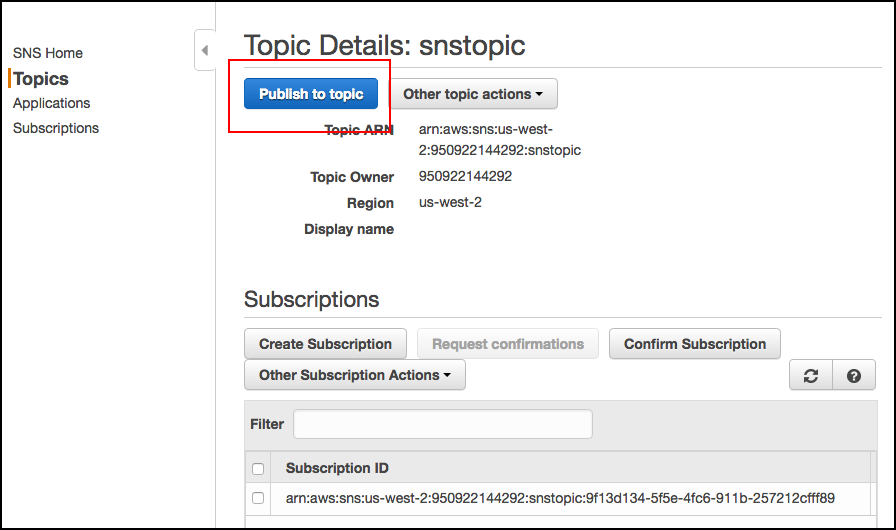
In the Topic Details page, click the button labeled, Publish to topic as shown below in Figure 24.
Clicking the button labeled, Publish to topic takes you the dialog in which you enter the Subject of the message you want to send. Also, you enter the text of the Message itself. Enter the Subject and Message, then click the button labeled, Publish message. (Please see Figure 25, below.)
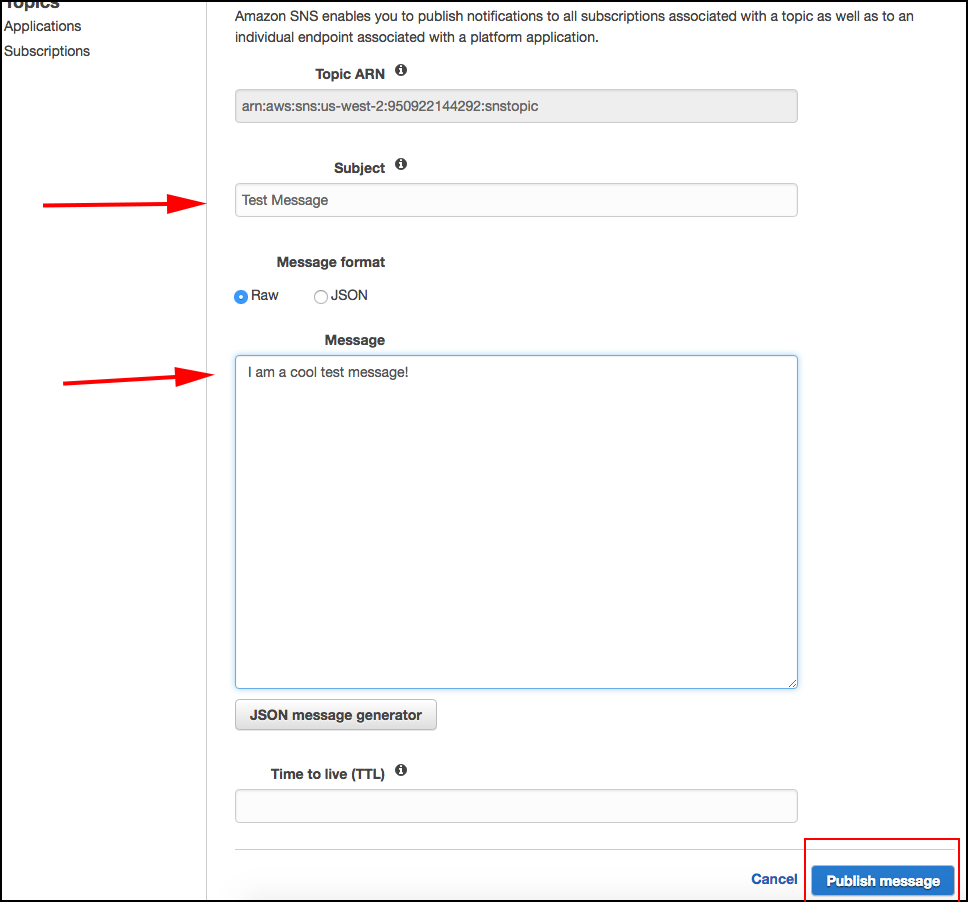
The message is now sent to the topic. Behind the scenes, the Lambda function that is subscribed to the topic will get the message and forward it onto the log set you defined on the Logentries site.
Viewing the Message in Log Entries
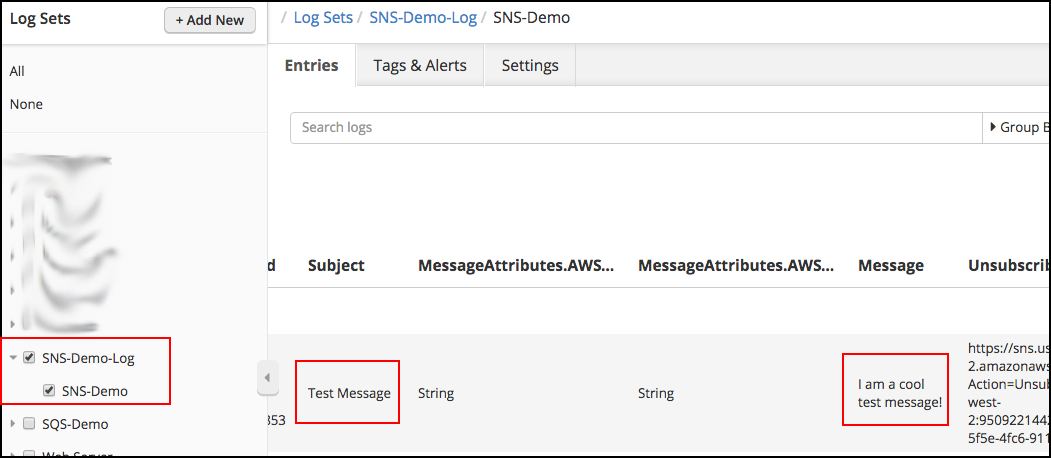
After you publish a message to the topic using the *Publish message *feature in the AWS Topic details page, wait a minute or two to given the message time to work its way through Logentries and into your log. Then, log in to the Logentries site and go to the Log Sets page.
Select the log that corresponds to the token we put in config.py earlier. Then the message published in AWS will be in the Logentries log. Figure 26, below shows the message we published in AWS appearing in the Logentries log set. We’re viewing the entry in table view.
Putting It All Together.
No doubt, using a Lambda function to forward messages sent to an SNS topic onto a Logentries log is a clever use of this emerging technology. If you are supporting a message driven architecture, you’ll find having the ability to monitor message activity at a very fine level of granularity a welcome tool when creating large scale, enterprise software.
If you decide you want to extend your ability to utilize Lambda functions, please be advised that at the present time AWS allows you to create Lambda functions in Node, Java and Python. Maybe over time other languages will be supported, but for now you’ll need to brush up on one of those languages if you want to take advantage of Lambda functions. But, it’s a small price to pay in return for the benefit of putting custom logic in The Cloud.
Once you get the hang of Lambda functions, you’ll be able to let Amazon take care of issues of scale and high availability allowing you to focus on making software. And, as we have learned on the terrain, there are few activities more fun and rewarding than making software that counts!